Easy Mart
- created: 02/10/2019
- latest update: 03/27/2019
- by: Codevibrant
- codevibrant.com/
- email: info@codevibrant.com
Installation
Installing Theme via the WordPress Interface
- Go to Dashboard > Appearance > Themes.
- Click on Add New.
- Search for the Easy Mart Theme.
- Click on Install and activate the theme.
Installing Theme Offline
- Download a Copy of Easy Mart Theme from wordpress.org or our site.
- Go to Dashboard > Themes > Click on Add New.
- Click on Upload Theme button.
- Browse for the theme you've have downloaded.
- Click on Install and Activate the theme.
Installation Via FTP/Cpanel
- Download a Copy of Easy Mart Theme from WordPress or our site.
- Now Connect the FTP server using the FTP details and copy the extracted folder to 'site-name/wp-content/themes/' path.
- Now, go to the Dashboard >> Appearance > Themes.
- You will see the Easy Mart theme in the theme dashboard.
- Activate the Easy Mart theme.
- Click on Dashboard >> Appearance >> customize for further setup.
Installing Theme via the WordPress Interface Pro Version
- Buy Easy Mart Pro Theme and save the downloaded theme zip file on your hard drive.
- Easy Mart Pro comes in the zip file.
- Go to Dashboard >> Appearance >> Themes >> Add New.
- Click on Upload Theme button at the top and browse the easy-mart-pro.zip file from the extracted/unzipped in your computer file location.
- Click on Install and activate the theme.
- Click on Dashboard >> Appearance >> Customize, for further setup.
Installation via FTP/CpanelPro Version
- Buy Easy Mart Pro Theme and save the downloaded theme zip file on your hard drive.
- Easy Mart Pro comes in the zip file.
- Now, Connect the FTP server using the FTP details and copy the extracted folder to 'site-name/wp-content/themes/' path
- Now, go to the Dashboard >> Appearance >> Themes.
- You will see the Easy Mart Pro theme in the theme dashboard.
- Activate the Easy Mart Pro theme.
- Click on Dashboard >> Appearance >> Customize for further setup.
General Settings
Configure site logo/title/favicon

- Go to Dashboard >> Appearance >> Customize >> General Settings >> Site Identity.
- Click on the Select Logo to upload or change site logo from the existing logo. ( preferred size for the logo is 250 by 250 pixels ).
- Add the Site Title and Tagline on the box..
- Check the checkbox option about site title and tagline to display.
- Click on the Select Image for Site Icon.
- Then, click on the Save & Publish button.
Configure Header Text Color
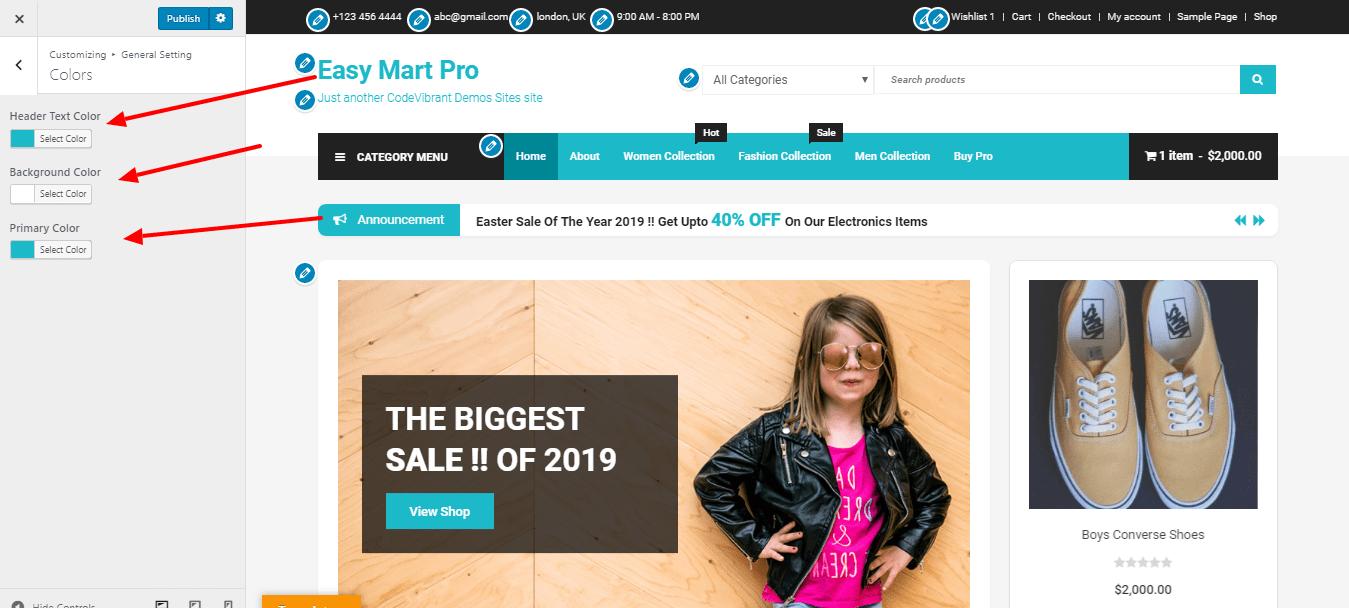
- Go to Dashboard >> Appearance >> Customize >> General Settings >> Colors.
- Choose the color for header text of your site from Header Text Color option. From here you can choose any template color for header text of your site.
- Then, click on Save & Publish button.
Header Text Color is available only when the checkbox option about site title and tagline is checked.
Configure Background Color
- Go to Dashboard >> Appearance >> Customize >> General Settings >> Colors.
- Choose the color for the background from the Background Color option. From here you can choose any template color for the background of your site.
- Then, click on the Save & Publish button.
Configure Primary ColorPro Version
- Go to Dashboard >> Appearance >> Customize >> General Settings >> Colors
- Choose the primary color from the Primary Color Option . From here you can change any template hover color for your site.
- Then, click on the Save & Publish button.
Configure Site SettingPro Version

- Go to Dashboard >> Appearance >> Customize >> General Settings >> Site setting.
- Click the enable/disable the option to display Wow Animation.
- Click on the enable/disable option to display Site Preloader.
- If you enable site preloader, select the available options from the site preloaders box.
- Choose the suitable site layout from available options under Site Layout.
- Then, click on the Save & Publish button.
Configure Background Image
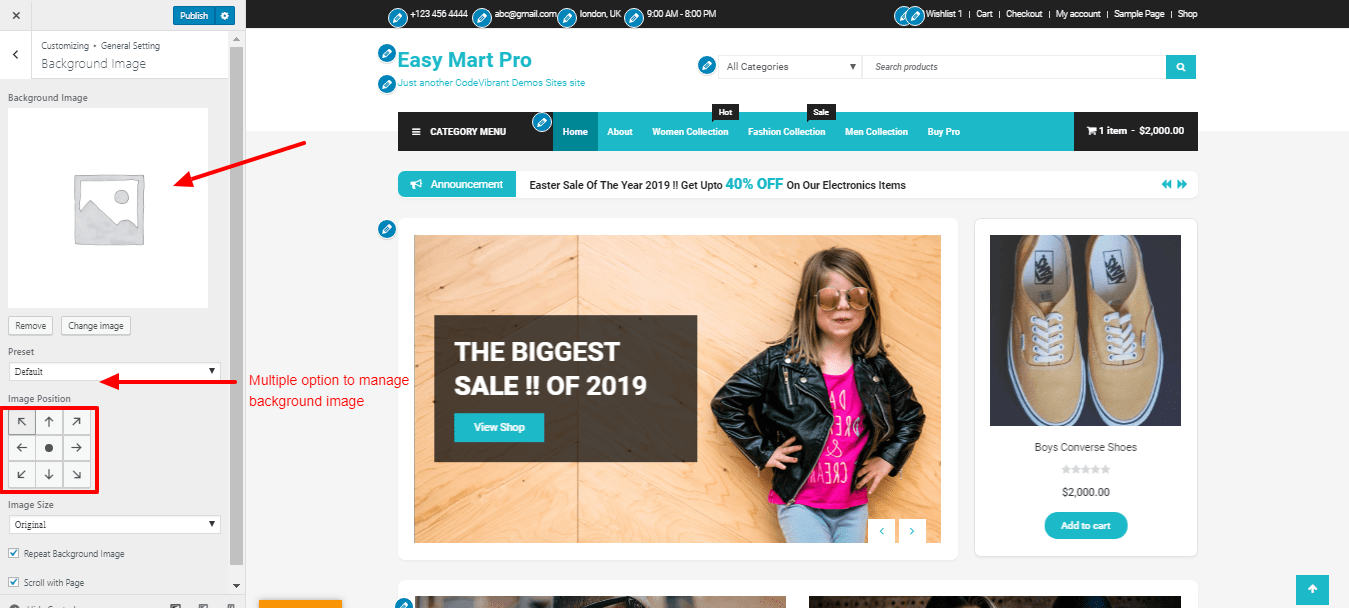
- Go to Dashboard >> Appearance >> Customize >> General Settings >> Background Image.
- Click on Select Image button.
- Upload or choose an image for website background. Once you select image then many settings about background image is visible.
- Once select image then choose Image position and Image size. Then, check the box to repeat the background image and scroll with the page. Pro-Version
- Then, click on Save & Publish button.
Configure HomePage Settings
- Go to Dashboard >> Appearance >> Customize >> General Settings >> HomePage Settings.
- Choose your latest posts/a static page on the homepage displays option.
- If you choose a Static page, select the available options on the homepage box.
- Next, Select the available options on the post pages box.
- Tick on the checkbox if you want to hide the latest posts in the frontpage.
- Then, click on the Save & Publish button.
Header Panel
Configure Top Header Section

- Go to Appearance >>Customize >> Header Panel >>Top Header Section.
- Click on the left or right checkerbox to align the Site Contact Information.Pro Version
- Add Contact Number, Email and Adress Text on the box.
- Click on the Show/Hide option to display wishlist.
- If you show wishlist section, then add Wishlist Text on the box.
- Click on Save & Publish Button.

Configure Header Section
- Go to Appearance >> Customize >> Header Panel >> Header Section.
- Click on the Show/Hide option to display
- Click on the Show/Hide option to display a cart.
- Click on the Save & Publish Button.
Configure Header LayoutPro Version
- Go to Appearance >> Customize >> Header Panel >> Header Layout.
- Choose the suitable header layout from the option under Header Layout.
- Click on the Save & Publish Button.
Front Page Panel
Configure Annoucement Ticker Section

- Go to Dashboard >> Appearance >> Customize >> Frontc Page Panel>> Annoucement Ticker Section.
- Click on the Show/Hide option to display announcement ticker section.
- Enter Ticker Caption.
- Click on the add new. Enter Ticker Text on the box.
- Then, click on the Save & Publish button.

Configure Feature Slider SectionPro Version
- Go to Dashboard >> Appearance >> Customize >> Front Page Panel>> Feature Slider Section.
- Click on the add new to add Feature Item.
- Click on the add image to add feature slider image.
- Then, add feature slider tiltle and feature link on the boxes.
- Then, click on the Save & Publish button.
Configure Promo Section

- Go to Dashboard >> Appearance >> Customize >> Front Page Panel >> Promo Section.
- Click on the Add new Button.
- Add the single promo icon from available options and type single promo title on the box.
- Then, type single promo sub tilte on the box.Pro Version
- Then, click on the Save & Publish button.
Configure Partner Section

- Go to Dashboard >> Appearance >> Customize >> Frontpage Settings >> Partners Section.
- Click on the Add new Button.
- Add new image and type the URL on the box.
- Then, click on the Save & Publish button.
Additional Setting
Configure Sticky Menu Setting
- Go to Dashboard >> Appearance >> Customize >> Additional Setting>>Sticky Menu Setting
- Click on the Show/Hide option to display sticky menu.
- Then, click on the Save & Publish button.
Configure Follow Us Setting
- Go to Dashboard >> Appearance >> Customize >> Additional Setting>>Follow Us Setting
- Check the checkerbox to add the social icon link target blank.Pro Version
- Click on the Add new Follow Icon
- Click on Add new Follow Icon to add a new follow icon then choose the social icon that you want to add and copy paste the Link of the social link under the Link box.
- Drag & Drop the item to re-arrange the order.
- Click on Remove to remove the social icon.
- Then, Click on the Save & Publish button.
Configure Scroll to Top Button Setting
- Go to Dashboard >> Appearance >> Customize >>Additional Setting >> Scroll to Top Button Setting
- Click on Show/Hide to display scroll to top button.
- Then, Click on the Save & Publish button.

Design Setting
Configure Pages
- Go to Dashboard >> Appearance >> Customize >> Design Settings >> Page Setting.
- Choose the suitable sidebar layout from available options under Page Sidebars Layout.
- Then, Click on the Save & Publish button.
Configure Archives Pages
Settings are effected on the archive, categories, search pages.
- Go to Dashboard >> Appearance >> Customize >> Design Setting >> Archive Setting.
-
Choose the suitable archive sidebar layout from available options under Archive Sidebar Layout.
-
Choose the suitable archive post layout from available options under Archive Post Layout.Pro Version
-
Then, click on the Save & Publish button.
Configure Posts
- Go to Dashboard >> Appearance >> Customize >> Design Setting >> Post Setting.
- Choose the suitable sidebar layout from available options under Post Sidebar Layout.
- Then, click on the Save & Publish button.
Selected post sidebar layout is globally affected in all posts.
Configure 404 Pages.Pro Version
- Go to Dashboard >> Appearance >> Customize >> Design Setting >> 404 Page Setting.
- Click on the Enable/Disable option to add custom 404 content.
- Then, add Page Title on the box.
- Click on the " Select Image" to add the Image.
- Now, add Page Content on the box.
- After that, click on the Save & Publish button.
Configure Woocommerce Page Setting
- Go to Dashboard >> Appearance >> Customize >> Design Settings >> Woocommerce Page Setting.
- Choose the suitable sidebar layout from available options under Page Sidebars Layout.
- Then, Click on the Save & Publish button.
This setting only appears after you activate your woocommerce plugin.
Configure Product Design LayoutPro Version
- Go to Dashboard >> Appearance >> Customize >> Design Settings >> Product Design Layout.
- Choose the suitable product layout from available options under Product Layout.
- Then, Click on the Save & Publish button.
Typography Section
- Go to Dashboard >> Appearance >> Typography Setting.
- Here is the section for Paragraph, H1, H2, H3, H4, H5, H6 and primary menu. All section have same options to configure.
- Options are given below
- Set the Font Family, varient, Text Transform, Text Align, Font Size, Line Height and Font Color.
- Then, Click on Save & Publish button.
Home Page Widget SectionsPro Version
Configure Header Section

The section is displayed after the site logo.
- Go to Dashboard >> Appearance >> Customize >> Widgets.
- Select/Drag EM:Advanced Product Search on Home Page Section widget area.
Allows to search all your product.
- Enter the section title under Title text box.
- Then, click on Save button.
Configure Frontpage Top Section

1. Configure EM:Slider
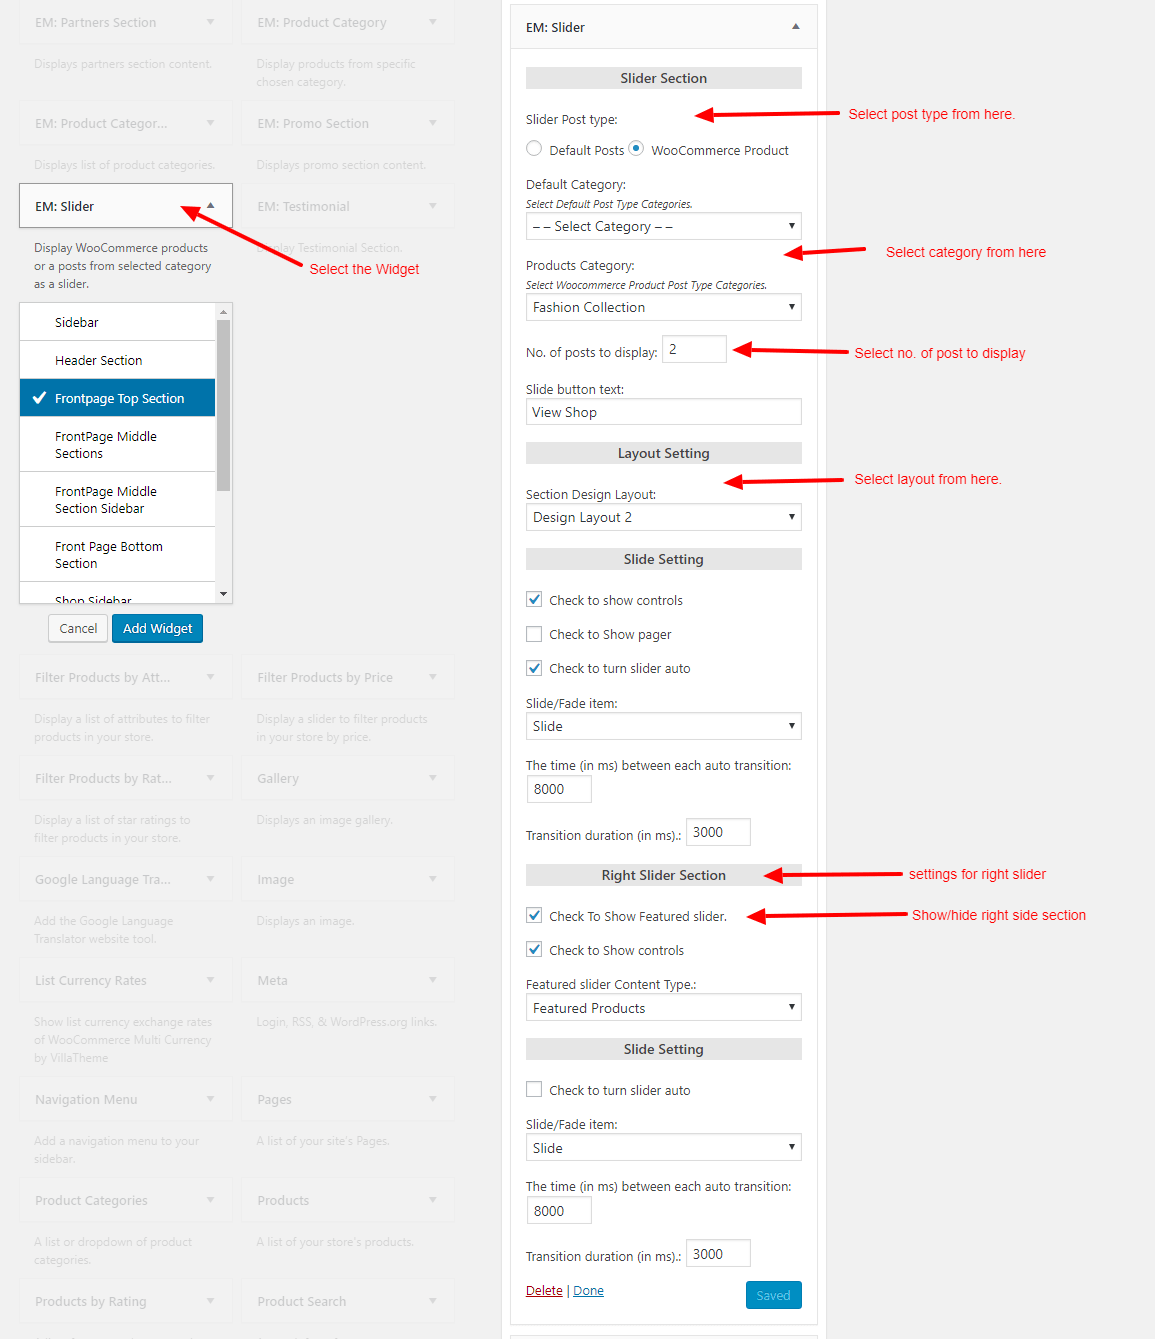
- Go to Dashboard >> Appearance >> Widgets.
- Select/Drag the EM: Slider widget on Home Page Section widget area.
- Check the option to choose slider post type.
- Select the default category and product category for the section under Default Category and Product Category from the drop-down option.
- Define value to show the number of product on the slider.
- Add slider button Text.
- Choose Section Design Layout from the drop-down option.
- Define the slider extra options like controls, pager, autoplay, fade time and speed.
Featured section content will manage from customizer panel. So click here about configure steps.
- Then, click on the Save and publish button.
2.Configure EM: Product Category Collection
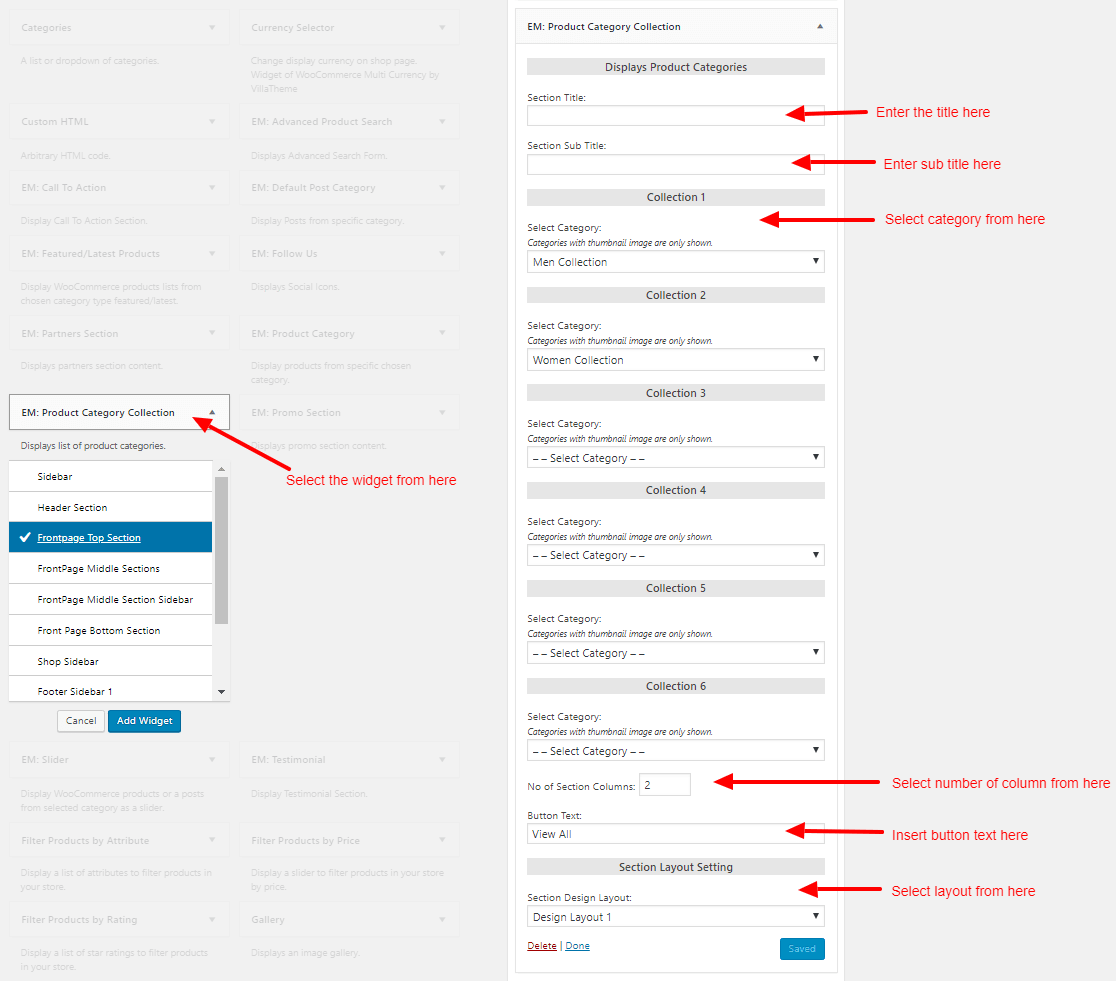
- Go to Dashboard >> Appearance >> Widgets.
- Select/Drag the EM: Product Category Collection widget on Home Page Section widget area.
- Enter Section Title and Section Sub Title on the box .
- Select catergory from drop-down option.
Categories With thubnail images are only shown.
- Enter button text on the box.
- Choose layout under Section Design Layout.
- Define value to show the number of section column.
- Then, click on Save button.
Configure Frontpage Middle Section
1. Configure EM: Featured/Latest Products
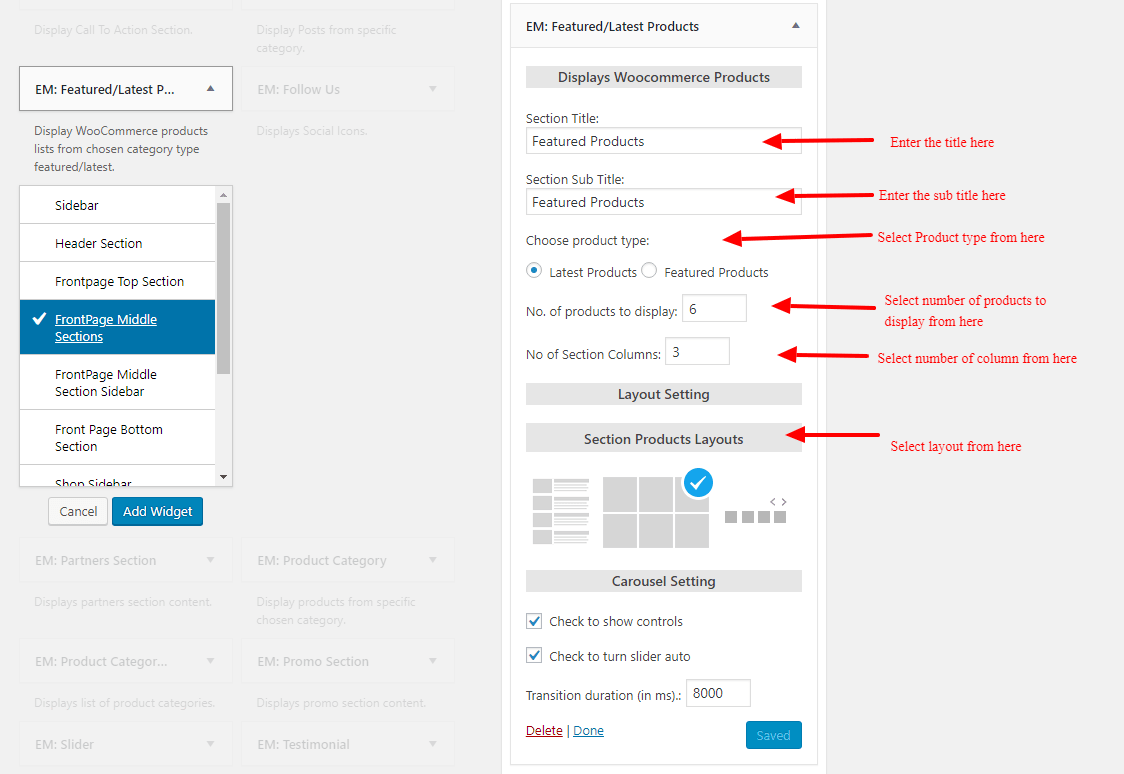
- Go to Dashboard >> Appearance >> Widgets.
- Select/Drag the EM: Featured/Latest Products widget on Home Page Section widget area.
- Enter Section Title and Section Sub Title on the box .
- Define value to show the
- Define value to show the number of product and number of section column.
- to display and number of section column.
- Choose the section product layout as you like.
- Define the slider extra options like controls, slider auto, and transition duration.
- Then, click on Save button.
2. Configure EM: Product Category
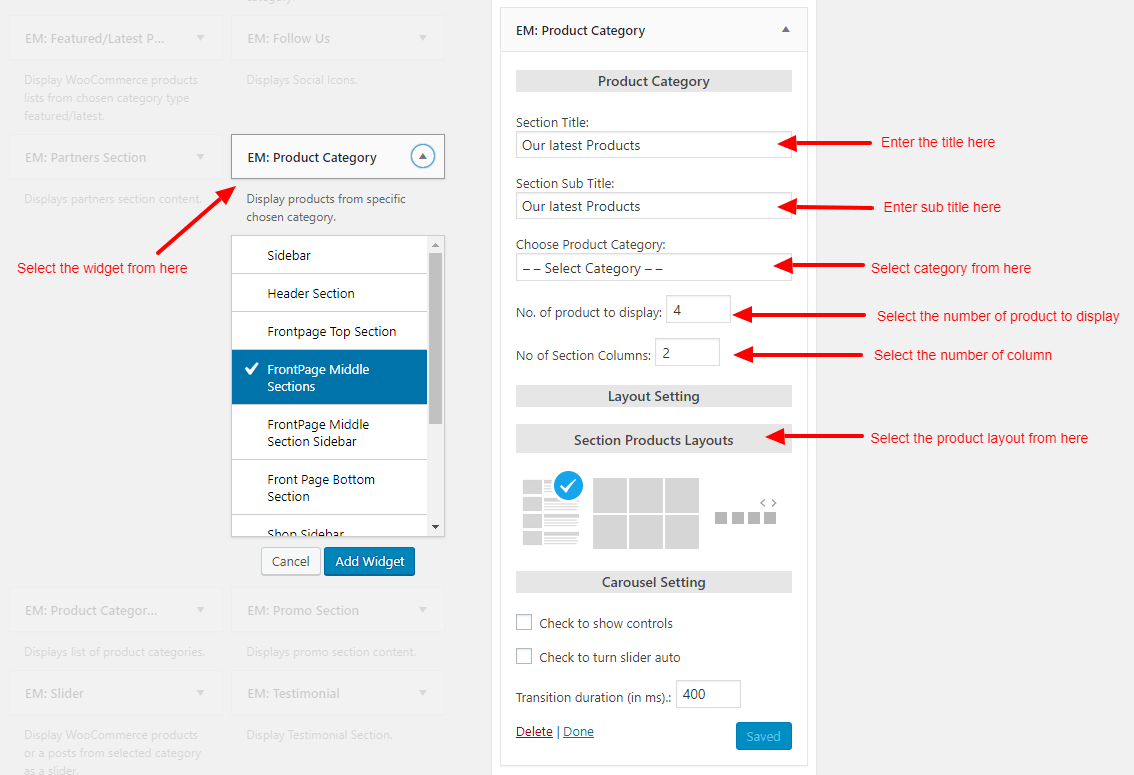
- Go to Dashboard >> Appearance >> Widgets.
- Select/Drag the EM: Product Category widget on Home Page Section widget area.
- Enter Section Title and Section Sub Title on the box .
- Choose the Product Category from drop-down option.
- Define value to show the number of product and number of section column.
- Choose the Section Products Layouts as you like.
- Define the slider extra options like controls, slider auto, and transition duration.
- Then, click on Save button.
3. Configure Advanced Product Search

- Go to Dashboard >> Appearance >> Widgets.
- Select/Drag the advanced product search widget on Home Page Section widget area.
- Enter the title on the box.
- Then, click on Save button.
Configure Frontpage Middle Section Sidebar
1. Configure Image
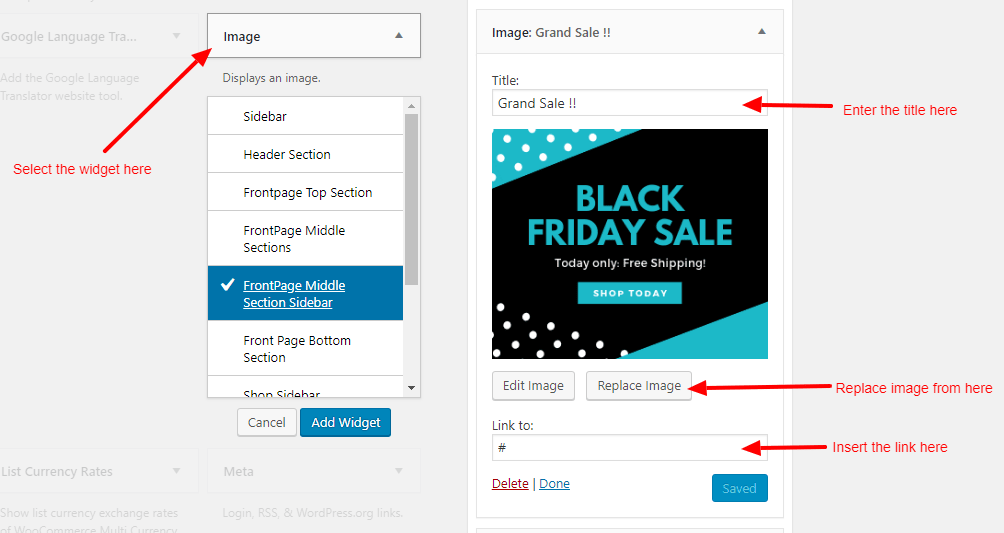
- Go to Dashboard >> Appearance >> Widgets.
- Select/Drag the Image widget on Home Page Section widget area.
- Enter the title on the box.
- Click on the Edit Image radion button to edit the image.
- Now, enter the Link under the link to box.
- Then, click on Save button.
.2 Configure Product Category
- Go to Dashboard >> Appearance >> Widgets.
- Select/Drag the Product Category widget on Home Page Section widget area.
- Enter Section Title and Section Sub Title on the box .
- Choose the Product Category from drop-down option.
- Define value to show the number of product and number of section column.
- Choose the Section Products Layouts as you like.
- Define the slider extra options like controls, slider auto, and transition duration.
- Then, click on Save button.
Configure Page Bottom Section

1. Configure EM: Default Post Category

- Go to Dashboard >> Appearance >> Widgets.
- Select/Drag the EM: Default Post Category widget on Home Page Section widget area.
- Enter Section Title and Section Sub Title on the box .
- Choose the Category from drop-down option.
- Define value to show the number of post and number of section column.
- Choose the Section Design Layouts as you like.
- Then, click on Save button.
2. Configure EM: Promo Section

- Go to Dashboard >> Appearance >> Widgets.
- Select/Drag the EM: Promo Section widget on Home Page Section widget area.
This secttion is customized from the customizer.
- Enter Section Title and Section Sub Title on the box .
- Choose the Section Design Layouts as you like.
- Then, click on Save button.
3. Configure EM: Call To Action
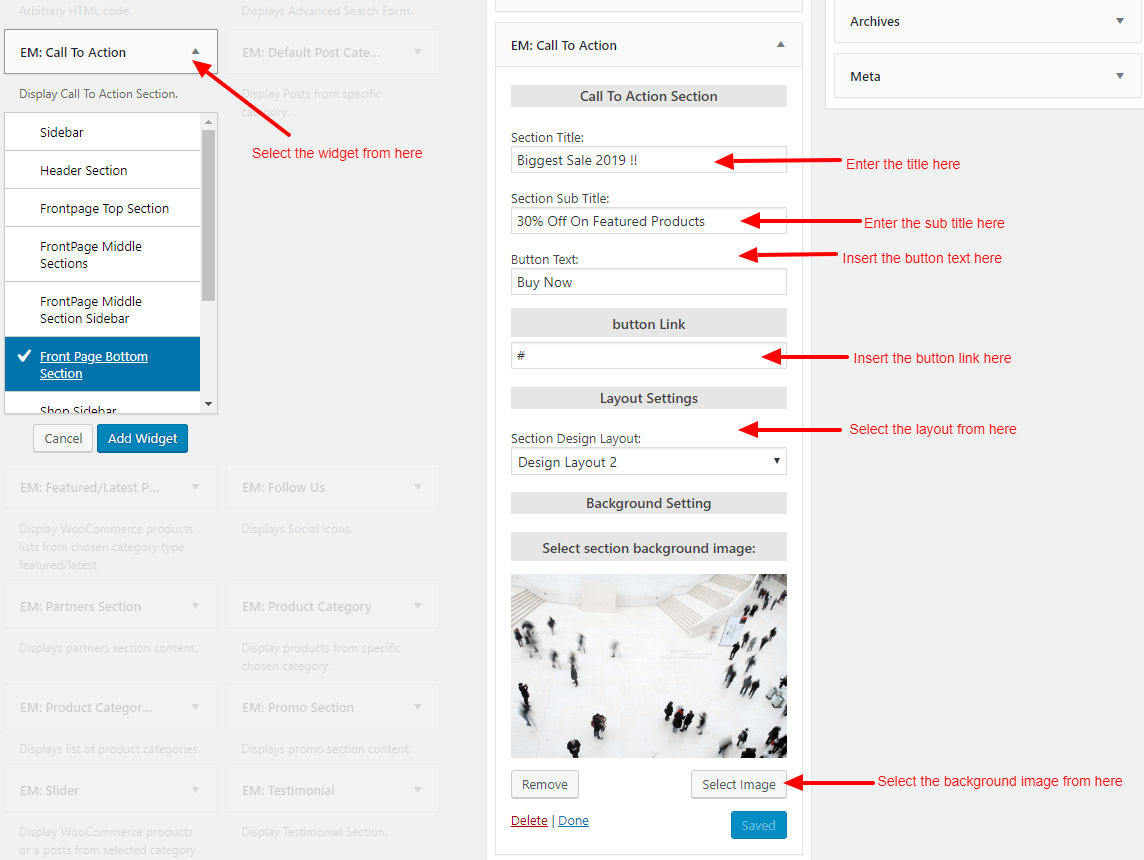
- Go to Dashboard >> Appearance >> Widgets.
- Select/Drag the EM: Call To Action widget on Home Page Section widget area.
- Enter Section Title and Section Sub Title on the box .
- Enter the button Text and button Link on the box.
- Choose the Section Design Layouts as you like.
- Click on the Select Image to select section background image.
- Then, click on Save button.
4. Configure EM: Testimonials

- Go to Dashboard >> Appearance >> Widgets.
- Select/Drag the EM: Testimonials widget on Home Page Section widget area.
- Enter Section Title and Section Sub Title on the box .
- Choose the Category to display from drop-down option.
- Define value to show the number of post.
- Choose the Section Design Layouts as you like.
- Define the slider extra options like pager, slider auto, slide/fade item , number of slide to show and transition duration.
- Then, click on Save button.
5. Configure EM: Partner Section

- Go to Dashboard >> Appearance >> Widgets.
- Select/Drag the EM: Partner Section widget on Home Page Section widget area.
- Enter Section Title and Section Sub Title on the box.
This secton is customized from customizer.
- Choose the Section Design Layout to display from drop-down option.
- Define the slider extra options like control, slider auto, and transition duration.
- Then, click on Save button.
Woocommerce
Configure Store Notice
- Go to Dashboard >> Appearance >> Customize >> Woocommerce>> Store Notice.
- Type your text on the box.
- Click on the checkerbox to enable store notice to show text about events on site-wide.
- Then, click on the Save & Publish button.
Configure Product Catalog
- Go to Dashboard >> Appearance >> Customize >> Woocommerce>> Product Catalog.
- Select the shop page display, category display, and default product sorting from the drop-down option.
- Then, click on the Save & Publish button.
Configure Product Image
- Go to Dashboard >> Appearance >> Customize >> Woocommerce>> Product image.
- Add the main image width and thumbnail width from the drop-down option.
- Choose the thumbnail cropping from the given option.
- Then, click on the Save & Publish button.
Configure Checkout
These options let you change the appearance of the Woocommerce checkout.
- Go to Dashboard >> Appearance >> Customize >> Woocommerce>> Checkout.
- Select the Company name field, Address line 2 field and phone filed from the drop-down option.
- Then Select the privacy policy page and Terms and Conditions Page from the drop-down option below.
The Privacy Policy Page and Condition Page must be pre-made.
- Optionally add privacy policy text under Privacy Policy.
- Optionally add terms and conditions under Terms and Conditions.
- Check out the box to high light required field with an asterisk.
- Then, click on the Save & Publish button.